Chair Exercises for Seniors: A 15-Minute Seated Strength Routine and a 30-Second Leg Strength Test

Chair exercises aren’t just gentle stretching. Done with enough effort, seated and sit-to-stand moves build the leg and arm strength you need to get out of a chair, climb stairs and catch yourself if you trip. A 2021 review of 25 studies with nearly 1,400 older adults found that chair-based exercise programs improved grip strength, arm strength and leg strength compared with no exercise (Klempel et al., 2021).
Below is a quick test to see where your leg strength stands, then an eight-move routine that takes about 15 minutes. All you need is a sturdy chair, and later a resistance band or a pair of light weights.
First, test your leg strength
The 30-second chair stand test is what doctors and physical therapists use to check leg strength and fall risk. It’s part of the CDC’s STEADI fall-prevention toolkit.
- Use a firm chair without arms, with its back against a wall so it can’t slide.
- Sit in the middle of the seat, feet flat, arms crossed over your chest.
- Have someone time 30 seconds. Stand all the way up, then sit all the way down, as many times as you can.
- Count the full stands. If you’re more than halfway up when time runs out, count it.
If you need your arms to push up, stop. That result alone is worth telling your doctor.
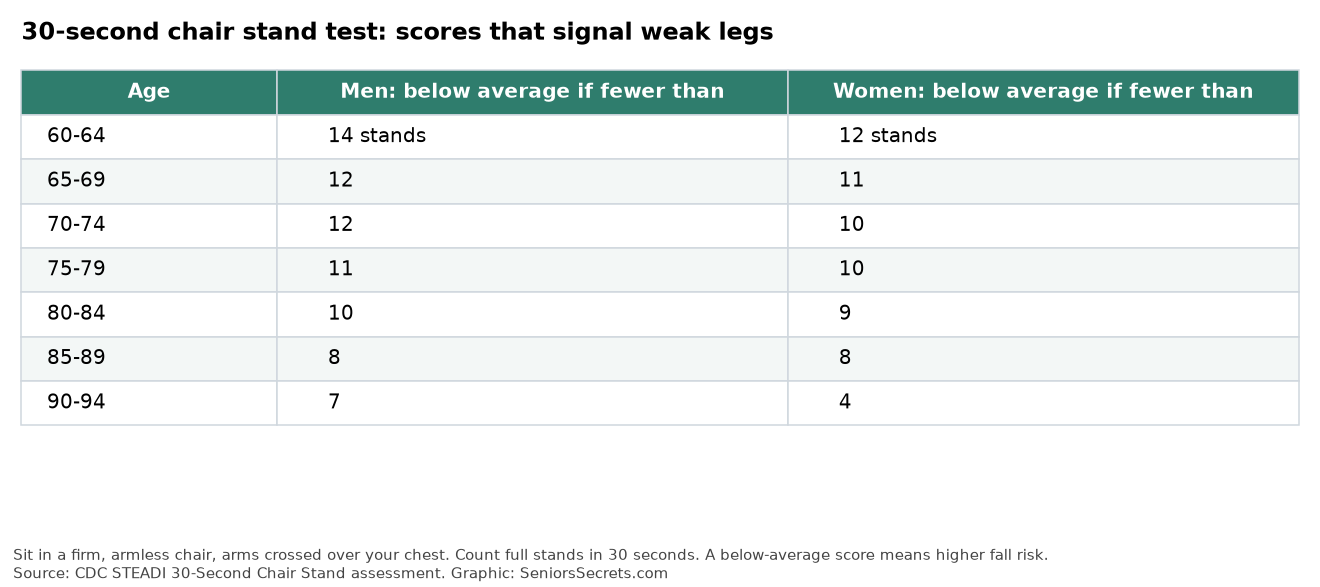
Write your score down and repeat the test every four to six weeks. It’s the easiest way to see the routine working.
Before you start
- Use a sturdy chair without wheels, ideally pushed against a wall. A dining chair is better than a soft armchair.
- Wear shoes with a non-slip sole, or go barefoot on a non-slip floor. Socks on wood floors are a fall risk.
- Breathe out on the effort and don’t hold your breath, especially if you have high blood pressure.
- Aim for moderate effort. You should be able to talk but not sing. The last two reps of each set should feel hard.
- Stop and seek help for chest pain or pressure, new shortness of breath, dizziness or sharp joint pain.
If you have heart disease, uncontrolled blood pressure, a recent surgery or a joint replacement, check with your doctor or physical therapist first.
The 15-minute chair routine
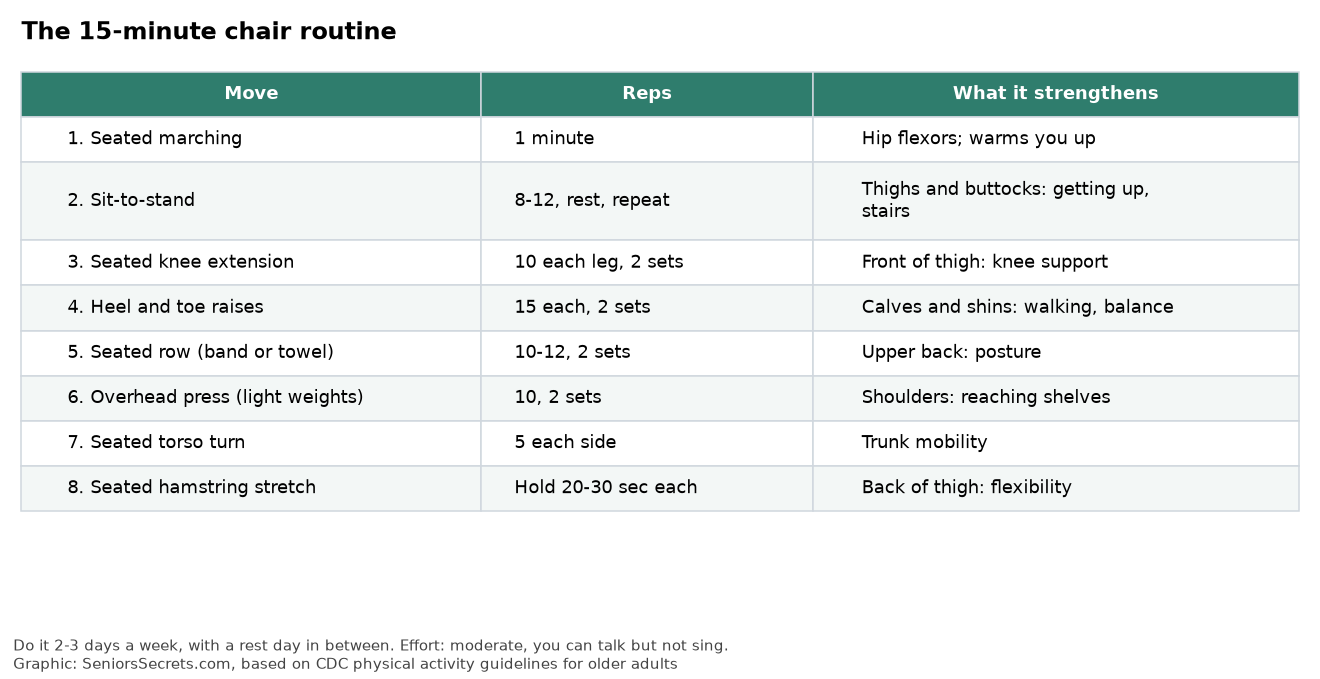
1. Seated marching (warm-up)
Sit tall toward the front of the chair. Lift one knee a few inches, lower it, then lift the other, swinging your arms as if walking. Keep going for one minute, picking up the pace as you warm up.
2. Sit-to-stand
This is the most important move in the routine because it trains exactly what you do every time you get up. Sit near the front edge, feet hip-width apart and slightly behind your knees. Lean forward (“nose over toes”) and stand up, then lower yourself slowly, taking about three seconds to sit. Do 8 to 12, rest a minute, and repeat.
Too hard? Use your hands on the armrests or your thighs, or put a firm cushion on the seat. Too easy? Cross your arms, slow down further, or hold a weight at your chest.
3. Seated knee extension
Sit back with your feet flat. Straighten one leg until it’s level with the seat, squeeze the front of your thigh for two seconds, then lower slowly. Do 10 on each leg, two sets. Add a light ankle weight when this gets easy.
4. Heel and toe raises
With feet flat, lift both heels as high as you can, then lower. Then lift your toes, keeping heels down. Do 15 of each, two sets. For more challenge, press down on your knees with your hands as you lift your heels.
5. Seated row
Loop a resistance band around your feet, or hold a towel with both hands and press your feet against its middle. Pull your elbows back, squeezing your shoulder blades together, then return slowly. Do 10 to 12, two sets. This counters the forward slump that comes with age.
6. Overhead press
Hold a light weight or a full water bottle in each hand at shoulder height, palms forward. Press up until your arms are nearly straight, then lower slowly. Do 10, two sets. Skip this one or keep it below shoulder height if you have shoulder pain.
7. Seated torso turn
Sit tall, cross your arms over your chest, and slowly turn your upper body to one side as far as is comfortable, then to the other. Do 5 to each side. Move gently, especially if you have osteoporosis.
8. Seated hamstring stretch
Sit at the front of the chair and straighten one leg with the heel on the floor and toes up. Keep your back straight and lean forward slightly from the hips until you feel a stretch behind the thigh. Hold 20 to 30 seconds on each side.
How often, and how to progress
The CDC recommends that adults 65 and older do muscle-strengthening activities at least two days a week, plus about 150 minutes a week of moderate aerobic activity and balance training. This routine covers the strength part. A daily walk covers much of the rest.
Make the routine harder about every two weeks, when the last reps no longer feel hard:
- Add reps up to 15, then add a third set.
- Slow down, especially the lowering part of each move.
- Add resistance: a stronger band, ankle weights or heavier dumbbells. My resistance band guide shows how to choose one.
- Stand up: once sit-to-stands are easy, start doing some moves standing, holding the chair back for support.
Strength isn’t the only thing that keeps you on your feet. Add balance exercises on the other days, since programs that combine balance and strength prevent the most falls.
Variations for specific needs
- Painful knees: keep knee extensions small and pain-free and use a higher seat for sit-to-stands. My guide to chair exercises for bad knees has a full knee-friendly routine.
- Stiffness rather than weakness: chair yoga focuses on flexibility and breathing and pairs well with this routine.
- Low muscle mass (sarcopenia): strength work matters even more, and protein does too. See my article on sarcopenia and strength training.
If you’ve had a fall, a joint replacement or a stroke, ask your doctor for a referral to physical therapy. Medicare Part B covers outpatient physical therapy when it’s medically necessary. You pay 20% of the approved amount after the deductible.
If your knees hurt
Chair exercises are one of the easiest ways to keep moving with knee arthritis, because your body weight is off the joint. A few adjustments make the routine kinder to sore knees:
- Keep the range small at first. For seated leg extensions, straighten only as far as is comfortable and hold for a slow count of three. Skip ankle weights until that feels easy.
- Add three knee-friendly moves. Ankle circles and toe taps get blood moving and loosen stiff joints first thing in the morning. Seated calf raises (lift your heels, keep your toes on the floor) build lower-leg strength without bending the knee much. Seated side leg lifts (slide one leg out to the side and back) work the hip muscles that help steady the knee.
- Warm up before strength work. Two minutes of seated marching first makes the rest of the routine more comfortable.
- Use the two-hour pain rule. The Arthritis Foundation puts it simply: if your joint hurts more two hours after exercising than before you started, you overdid it. Ease up next time, and see your doctor if the extra pain lasts more than a few days.
Stop and call your doctor about a knee that’s suddenly swollen, hot, red, or gives way. Those aren’t normal soreness. After a knee replacement, ask your surgeon or physical therapist which moves are safe before adding anything new.
FAQ
Are chair exercises enough exercise for seniors?
They can cover your strength training. You still need aerobic activity, such as walking, and balance work to meet the guidelines. If walking is hard, seated marching or a seated pedal machine can help.
How many times a week should I do chair exercises?
Two or three days a week for the strength moves, with a rest day in between. Gentle stretching and marching are fine daily.
Can chair exercises help prevent falls?
Yes, especially the sit-to-stand, knee extensions and heel raises, which build the leg strength you need to stay upright. Combine them with balance exercises for the best results.
What if I can’t stand up from the chair without my hands?
Use your hands and a higher seat, and keep practicing. Many people can stand without their hands after a few weeks. Let your doctor know, because it’s a sign of higher fall risk.
This article is for general information. Talk with your doctor or a physical therapist before starting a new exercise program if you have a health condition.
Related guides